Perhaps you’ve painted the perfect mini for your next
character. You got a brand new set of dice. You crafted a cool set piece for
your next D&D adventure.
Then you try to snap a photo to send to your pals.
Ugh. Not so good, huh?
It’s hard to get the right light. It’s hard to find a plain
background. It’s hard to get a good view of your glorious new miniature without
anything else being distracting.
We have a simple solution using something you probably have
on your desk right now: a Dungeon Crate box.
We send them to you every month. Now, with this little
tutorial and a few other things you likely have sitting around, you can turn
that Dungeon Crate box into a mini photo studio. You don’t even need a fancy
camera. Your smartphone will do just fine.
Supplies:
1.
Dungeon Crate shipping box
2.
Ruler or tape measure
3.
Pencil
4.
Razor or X-acto knife
5.
Tissue paper
6.
Tape
7.
Poster board or cardstock
8.
Lights
Directions:
1.
Cut off the top of the box.
That flap that says “Dungeon Crate?” Ditch it. We need a box with an open side so we can, you know, place something there and snap some photos.
That flap that says “Dungeon Crate?” Ditch it. We need a box with an open side so we can, you know, place something there and snap some photos.
2.
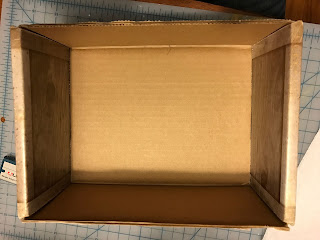
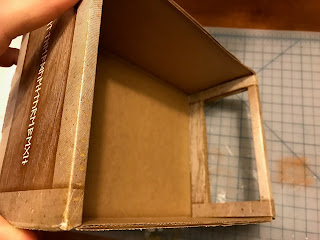
Measure and cut a 1-inch border.
The bottom of the Dungeon Crate box will be the back of your “photo studio.”
You’ll need to measure a 1-inch border and cut out the pieces on the right side
of the box and then do it again on the other side. Finally, do it on a third
side.
After all that, you should have a box with a back, a base and the other three sides (top, left and right) cut out.
After all that, you should have a box with a back, a base and the other three sides (top, left and right) cut out.
3.
Place tissue paper over each of the cutouts.
This is easy. Hold some tissue paper up to the box’s new cutouts and cut the tissue paper to fit.
Tape the tissue paper over the cutouts. Any sturdy tape should do the job.
This is easy. Hold some tissue paper up to the box’s new cutouts and cut the tissue paper to fit.
Tape the tissue paper over the cutouts. Any sturdy tape should do the job.
4.
Insert your background.
Take the poster board and cut it to fit. It should be slightly larger than the back wall of the box so that when you insert it, it should curve from the inside the top of the box to the front edge on the box’s bottom.
Use paper clips or binder clips to clip it in place.
Take the poster board and cut it to fit. It should be slightly larger than the back wall of the box so that when you insert it, it should curve from the inside the top of the box to the front edge on the box’s bottom.
Use paper clips or binder clips to clip it in place.
5.
Place lights outside the tissue paper pieces.
Really, any light will do, but your best bet is bright white lights. Clamp lights work great and if you add light from the top, it will eliminate shadows. Experiment with the lighting and types of bulbs for best results.
Really, any light will do, but your best bet is bright white lights. Clamp lights work great and if you add light from the top, it will eliminate shadows. Experiment with the lighting and types of bulbs for best results.
6.
Snap your photos!
Put your miniature or whatever in the studio and take some photos.
7.
Show them off.


No comments:
Post a Comment